In today’s world, where sustainability is becoming more important, finding creative ways to reuse everyday items is a wonderful way to reduce waste while making something beautiful. One simple way to contribute to this eco-friendly movement is by upcycling colorful packaging from food, drinks, and cosmetics. Instead of throwing out that beautiful, high-quality paper or plastic, why not turn it into something useful, like gift tags, price labels or product presentation cards?
Why Upcycling Matters
Upcycling is not only environmentally friendly, but it also sparks creativity. Everyday products, such as chocolate boxes, often come in vibrant packaging with unique designs. By reusing these materials, you not only avoid waste but also create personalized, handmade items with a unique flair.
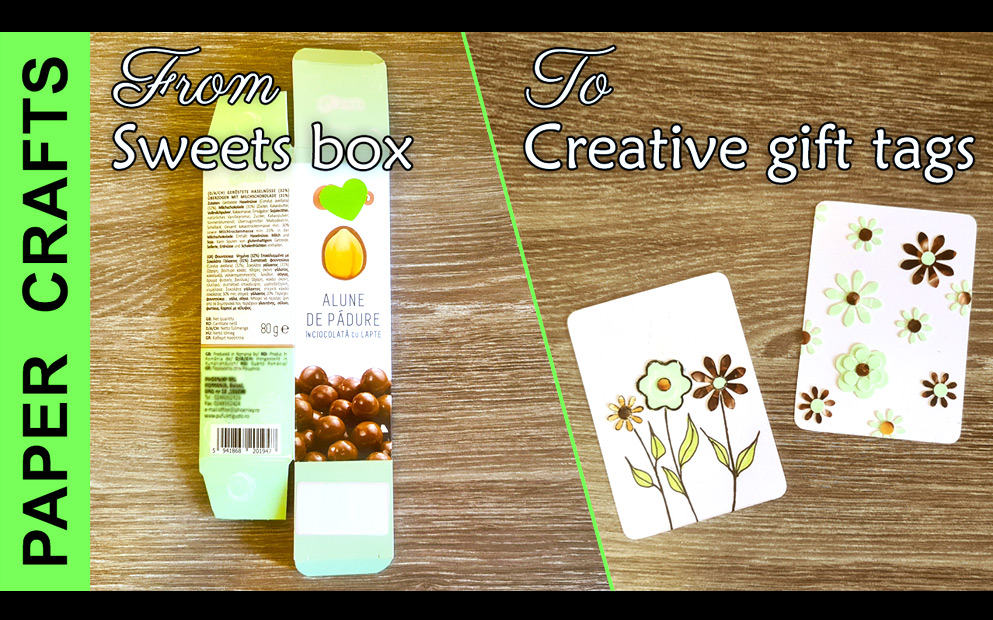
In this article, I’ll walk you through one of my favorite projects: turning a package of chocolate-coated peanuts into charming flower cards. This is a perfect way to create unique, eye-catching gift tags that are both functional and aesthetically pleasing.
Materials You’ll Need
To get started, you’ll need a few basic materials, many of which you might already have at home:
- Colorful packaging (like a chocolate-coated peanut box)
- A4 cardboard paper for the base
- Flower hole punchers
- Regular office hole puncher
- Glue (universal glue that won’t wrinkle the paper)
- Black permanent marker for details
- Scissors
- Heavier flat object (like a book) to press the cards
Step-by-Step Guide to Upcycling Chocolate Box Packaging
Step 1: Prepare Your Base
Start by cutting an A4 sheet of cardboard paper into nine equal parts. Each of these parts will serve as the base for your gift tags or product presentation cards.
Step 2: Open the Package
Carefully open your chocolate-coated peanut box by cutting along the folding lines. This will make it easier to access different parts of the packaging and help you cut out shapes cleanly.
Step 3: Punch Out Flower Shapes
I will use a 6-petal flower hole puncher to cut a flower from the bigger green parts of the box. Holding the hole puncher upside down will help me center the paper better and see exactly what I’m cutting. I will also make a few 2.5 cm daisies and from the smaller areas of the box I am cutting some 1 cm daisies.
I want to make a small daisy from the cute peanut on the box, so I’m cutting the package for easier access. And from the chocolate coated peanuts I’m making two big daisies and two small daisies. The bright, colorful parts of the packaging can be used to create various shapes, adding vibrant pops of color to your project.
Step 4: Create the Flower Centers
Next, use a regular office hole puncher to cut small circles from the remaining parts of the packaging. These circles will be used later as the centers for your flowers, adding detail and texture to the final design.
Step 5: Assemble Your Flowers
Now it’s time to to put everything together! For this I will use an universal glue for multiple surfaces including paper, that is not making the paper wrinkly.
3 flowers gift tag
Start by placing your cut-out flowers on the cardboard base. Flip each flower upside down, apply a small drop of glue to the center, and spread it across the petals using a scrap piece of paper.
Once the flowers are glued down, add the center circles to each flower, mixing and matching colors for a playful look. After assembling the flowers, press the card under a heavy object (such as a book) for about a minute to ensure everything sticks well.
To complete your design, use a black permanent marker to draw stems and leaves for the flowers. You can also color in the leaves to make them stand out or give your design a more cartoonish look by outlining the flowers.
Finally, cut round corners on the edges of the card for a more polished and professional appearance.
Multiple flowers gift tag
For my second card I will glue the flowers the same way, trying to maintain a color balance. Once all the flowers are added, put the card for 1 minute under a heavy object. After the card is pressed, it’s time to add the flower centers, mixing the colors. Press again for 1 minute, then cut the excess paper. Round the corners and your second card is done.
Step 6: Repeat for More Cards
Repeat the process to create multiple cards. You can experiment with different arrangements of flowers and colors to make each card unique.
Make the Most of Leftover Packaging
After finishing your project, you’ll likely have small scraps of packaging left over. Instead of discarding these pieces, use a hole puncher to create more small flowers or circles for future projects. Store these cutouts in a small bag for the next time you need to make gift tags or product labels.
This method of upcycling is not only creative but also practical. You’re transforming waste into something that can be reused and enjoyed, giving it a second life in a beautiful and functional form.
Conclusion: A Simple Yet Impactful Craft
Upcycling packaging into gift tags and cards is a simple way to reduce waste while creating something meaningful and unique. With a few basic tools, you can turn everyday materials into beautiful, handcrafted items that make perfect gifts or presentation pieces for your products.
This eco-friendly craft doesn’t just help the planet; it also encourages you to think outside the box (literally) and find beauty in the things we often overlook. So the next time you find yourself with some colorful packaging, instead of tossing it away, grab your scissors and hole puncher, and start crafting!
I hope you enjoyed this project. Follow us on Facebook, Instagram, Youtube and TikTok to get our latest handmade and homemade news!